

Convert Money File To Quicken
Sales of Microsoft Money ceased in 2009 and support ended in 2011, so migrating to another product, such as Quicken, makes good business sense. There is no need to start over from scratch since Quicken has the ability to import your existing files directly from Microsoft Money. You don't even need to export the files first, change the format or use a third-party program to convert them.
1
Start Quicken. Select the "File" menu, point to "File Import" and select "Microsoft Money File."
2
Select the file you want to move to Quicken and click "Import."
3
Wait while Quicken converts the file into the proper format and completes the import process. Click "Finish" when the file has been moved.
How to Convert Files from MS Money to QuickBooks Pro
For a small business, it may seem overwhelming when you have to deal with different accounting programs. Each program has its own advantages and disadvantages, so a small business may use an array of different programs to accomplish its bookkeeping goals. Converting files from Microsoft Money to QuickBooks Pro is a common problem that many small businesses face, but can be done easily with the right software.

1
Start Quicken and select the "File" menu. Select "Import" and find the Microsoft Money file you wish to convert.
2
Save the new file that opens. It should now be a .QDF file. This is the standard Quicken file format.
3
Open QuickBooks Pro. Go to the "File" menu, select "Utilities" and then click on "Convert from Quicken." Browse to find the .QDF file that you saved, and select it. Follow the remaining on-screen instructions to finish your file conversion.
How to Delete a Write-Protected File
If you run your own business, you understand the need to keep important business files organized on your hard drives. If you attempt to delete a file that you no longer need and receive an error warning you that the file cannot be deleted because it is read-only, you must disable the read-only attribute before you attempt to delete the file. Disabling the read-only attribute of a file in Windows 7 requires editing the file properties.
1
Click the Windows "Start" button and choose "Computer" from the menu to launch Windows Explorer.
2
Navigate to the folder that contains the read-only file.
3
Right-click the file and choose "Properties" from the context menu to open the file's Properties window.
4
Click the "General" tab if it's not already selected.
5
Clear the "Read-only" checkbox and click "Apply" to disable the read-only attribute.
6
Click "OK" to close the Properties window.
7
Select the file, press "Delete" and click "Yes" to move the file to the Recycle Bin. Hold "Shift," press "Delete" and then click "Yes" to permanently delete the file.
How to Open NBU Files
A file with the NBU file extension is a Nokia Phone Backup file. The NBU file type is created with the Nokia PC Suite synchronization software. An NBU file contains all phone data including contacts, messages and calendar events. The Nokia PC Suite software is installed on the computer you use to sync with the phone. You can open and extract all or part of an NBU file using the NokiSoft Noki application.
1
Open the Noki software.
2
Click the "File Type" drop-down box in Noki and click the "Backup Files (.nbu, .nfb, .nfc, .cdb, arc)" option.
3
Click the "Browse" button. A file navigation window opens.
4
Go to and click on the NBU file. The file loads in Noki.
5
Click the "File Type" drop-down box in the "Save As" section and click the type of file to export the data to. Selections include Text (.txt), Excel (.xls) and HTML (.html).
6
Click the "Save As" buttoni. The NBU file is opened and extracted to the desired file type.
How to Transfer Microsoft Money Files to Quicken
Sales and Support for Microsoft Money discontinued in back June 2009 and January 2011 respectively. Microsoft money played a wide role in personal financial software but wasn't a market leading product. Users of Microsoft Money can transfer files into Quicken. If you're planning to transfer Micrsoft Money files into Quicken. That's Great! and there is no need to start from scratch with Quicken. Quicken has the ability to import transactions from Microsoft money easily.
If you're using an old version of Microsoft Money you need to upgrade to the latest version. Money Plus Sunset Deluxe was the last version from Microsoft.
Things to remember before transferring Microsoft Money files to Quicken
1. Reconcile all of your accounts
2. Remove unused payees and categories
3. Make sure your account name should not exceed more than 40 characters (limit in Quicken)
4. Create a backup into a new folder or external drive.
Simple Steps to Convert Microsoft Files into Quicken
In this process first we need to backup Microsoft Money file
1. OpenMicrosoft Money
2. Go toFile > Back Up…

3. On your next browse a location to export it and clickSave
4. Now your Microsoft Money file is backed up successfully
Now as you backed up Microsoft Money file and it's ready to use it in Quicken. We would like to suggest you create a new Quicken file to import your Microsoft Money information, to create a new file
1.OpenQuicken
2. Go toFile > New Quicken File…
3. ChooseNew Quicken File and click onOK
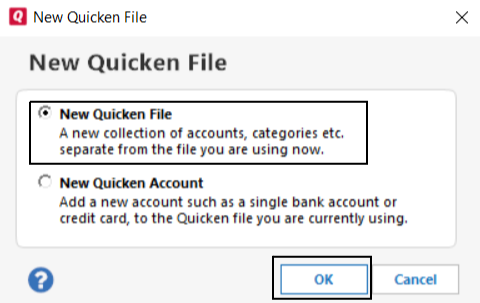
4. Give a name to your new Quicken file and clickSave
5. Quicken prompt you to login to yourQuicken ID andpassword
6. Once you enter your login click onSign In
7. Now follow on-screen instructions
8. As you're into your new Quicken file
9. Go toFile > Import > Microsoft Money® File…
10. Next screen will show you to import your file click on Open to import it
11. Now your file is completely imported in Quicken
Things to do after converting Microsoft Money Files to Quicken
You're almost ready to go after importing Microsoft Money Files to Quicken from but you need to do under the following steps to ensure everything is correct
A. Setup your account for online download
1. Click on the account to set up online download
2. Click on theGear Icon with a drop-down arrow and chooseSet up Online
3. Follow on-screen instructions
B. Setup online bills
1. Click on an account with which you want to set up online payments
2. Click on the top right Gear Icon with a drop-down arrow and chooseEdit account details
3. Click onOnline Services
4. Under Online bill payment click onset up Now…
5. Now follow on-screen instructions
C. Check your payee, category, and accounts
You may see payee, categories and account are different than Microsoft Money because characters are permitted and character length allowed in Quicken.
To check Account details
1. Go toTools > Account List
2. Click onEditfor the account that you want to change some information
3. Now you can apply the changes that you want.
To check payee details
1. Go toTools > Memorized Payee List
2. Click on a payee that you want to change
3. ClickEdit
4. Now you can apply the changes that you want and then click onOK
To check Categories details
1. Go toTools > Category List
2. Choose a category that you want to have some changes and right click on it
3. Click onEdit
4. Once changes applied then click onSave
How do I import/convert my Microsoft Money data to work in Quicken for Windows?
Product VersionWINDOWS SUBSCRIPTION154 people found this helpful
Disclaimer: We strongly recommend against the use of this process. Microsoft Money was last released in 2010 and has not been updated since. It is not certified to run on Windows 10. If you proceed, you do so at your own risk.
There are four steps in this process
- Learn about the conversion process.
- Prepare your MS Money file for conversion
- Convert your MS Money data file
- First steps to take in Quicken
Learn about the conversion process
What you need to know before converting
- Quicken is currently able to import files from Microsoft Money 2007 and 2008, and Money Plus Deluxe only. If you have an older version of Microsoft Money, you will need to upgrade. Download Microsoft Money Plus Deluxe to use for the process of importing your file into Quicken.
- Your Microsoft Money software must be installed on the same computer as Quicken.
- The version of the data file you plan to import must match the version of Microsoft Money you have installed. (For example, to import a Money 2007 file, you must have Money 2007 installed, and to import a Money 2008 file, you must have Money 2008 installed.)
- If you are in the process of reconciling your accounts in Microsoft Money, we recommend that you finish reconciling before importing (because Quicken won't know where you are in the process if you import mid-stream).
- Money should not be running during the import process. Please exit the program before starting.
Import your Microsoft Money file
- Create a new Quicken data file. SelectFile menu >New Quicken File… Your Quicken data file must be empty in order for the import to work properly.

- Once you've created and saved your new file, selectFile menu,File Import, thenMicrosoft Money© file….
- After you have imported your Microsoft Money file, we suggest you read the article After importing your Money File into Quicken.
- Recurring Automatic Payments ("Apay"):Before you import your data into Quicken, we recommend that you go into Money and cancel any Recurring Automatic Payments you have in Money. We'll import those payments into Quicken, but you'll have to set them up again to be paid online. Canceling your payments before importing ensures that you won't get duplicate bill reminders in Quicken when you sync up with your bank.
- Money Plus Home & Business customers: You may import your data into Quicken, but please be aware that some of your business-specific data—such as Project, Inventory, Customer, and Product data — will not be carried over. Quicken currently does not support the import of this data. However, the rest of your data — your accounts, scheduled bills, categories and transactions — will be imported.
- Merging data from Money and Quicken: Quicken is not able to merge data from a Money file into a Quicken file. It can only create a new Quicken file and then import your Microsoft Money data into it.
First steps to take in Quicken after converting
After you have completed your successful conversion, there are a few steps you should complete before continuing.
- Review your account and payee names to ensure they converted properly. Because of the slight differences between the two programs in maximum character length and permitted characters, you may need to change the names of some of your payees or accounts.
- Set up your accounts for Transaction Download and Online Bill Pay. Any instructions you had in Money may need to be reset in Quicken. You can also set up Quicken Bill Manager. For more information, click here.
- Set your recurring payments. If you stopped them there won't be any duplicate payments.
- Check your accounts' balances. There are some differences between how the two programs record information. As an example, Quicken separates the cash portion of your investing account into a banking account, while Money included this linked cash account in the investing total.
To review the full list of first steps, see Steps to take after importing your Money File into Quicken.
Convert Money File To Quicken
Source: https://errossolution.com/how-do-i-transfer-move-my-microsoft-money-files-data-in-quicken/
Posted by: madsonvalln1946.blogspot.com
0 Response to "Convert Money File To Quicken"
Post a Comment